Insurance Verification
Centers may choose to utilize Payer websites and/or call payers to obtain verification and benefits and manually enter in HST Practice Management, but there are also multiple ways in which this process can be automated.
Batch Verification
Case > Insurance Verification
The Insurance Verification form allows the creation of verification batches to send to a clearinghouse to verify insurance and then import the results back into HST Practice Management from the clearinghouse in standard ANSI 270/271 format.
In order to send eligibility inquiries a center must enroll with a clearinghouse and have the ability to submit batch requests. The clearinghouse must be able to accept a standard 270 ANSI file and return a 271 file in order to work with HST Practice Management.
Center Configuration must have Insurance Verification enabled and appropriate clearinghouse specific entries completed.
Payer Configuration > Misc Configuration tab must also be enabled for verification for each payer. Check the check box for Submit Insurance Verification. Complete the Elg Payer ID box if the payer has a separate ID for verification. Otherwise, the system will attach the ECS Payer ID entered on the Claims Configuration tab.
.png)
NOTE: Because there is no standardization or consistency in how payers report eligibility and benefits data to clearinghouses, HST Practice Management cannot guarantee the accuracy of the data received, nor can payer specific edits be made to the 270 file, but every attempt has been made to make the 271 import results as accurate as possible.
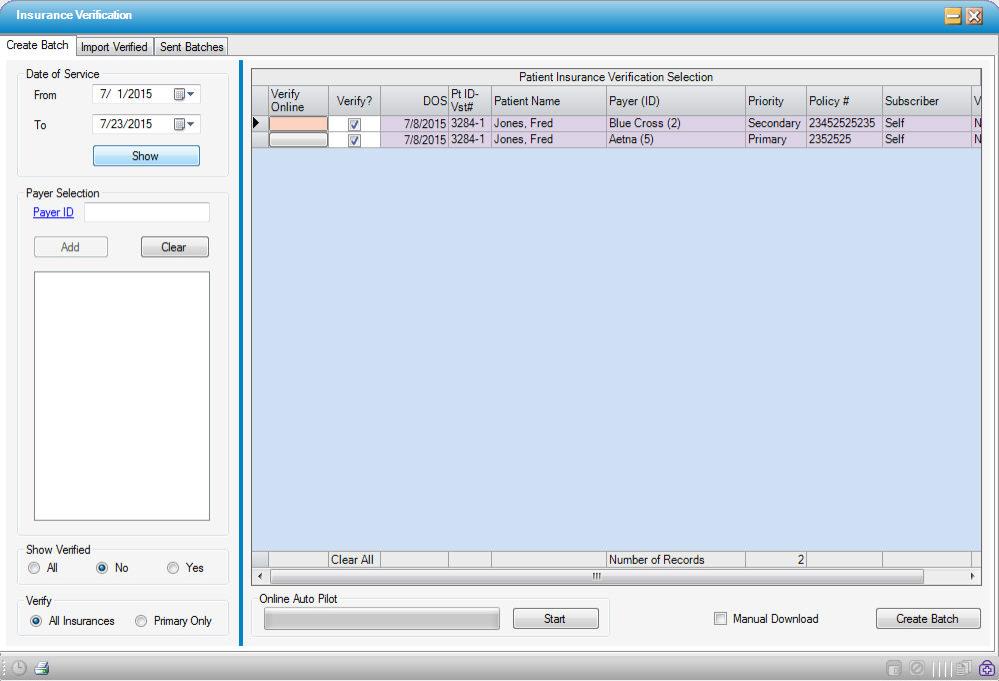
Create a Batch
-
Enter the desired date of service range. The system will default to the current date plus 14 days. These dates can be edited, within a range of up to 90 days. The results can be narrowed to show specific payer ID(s), only those cases verified or not yet verified, all insurances, or only the primary payers.
-
Select
 to view the cases that fall within the parameters selected. Cases that are ready to send will display in purple. Pink indicates a problem with the information on the case that will need to be corrected to enable verification for the visit(s).
-
Select
 for Real Time verification or
  to generate a batch to send or upload to the clearinghouse. The file name will be in the following format: 270_BatchXXX_MMDDYY.txt.
 -
Transmit or Upload to the clearinghouse.
-
When the batch has been successfully created, the system will confirm and create a Visit Notes indicating that an insurance verification record was created with payer and batch number included on the note.
-
If the center is configured, users may click the
 button to convert eligible batches to an SFTP file which can be uploaded to a clearinghouse.
-
Tip: Save to the same location every time for ease of retrieval.
-
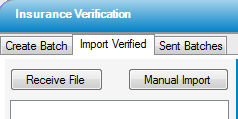
Import Verified Cases
Receive Files
-
Access the location where the 271 file from the clearinghouse has been saved.
-
Double-click to upload into HST Practice Management.
-
A pop-up will indicate that the batch Imported Successfully. Successful records will display in purple.
-
To jump to the Visit Insurance form for a particular patient, right-click on the patient in the grid.
Manual Import
The Manual Import also allows the user to manually import batches that have been downloaded from a clearinghouse
-
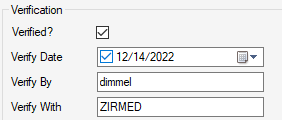
The Insurance Visit form for the visit verified will reflect that the following fields have been updated by the 271 import:
-
Verified?
-
Verify Date
-
Verify By (user who imported)
-
Verify With (clearinghouse)
-
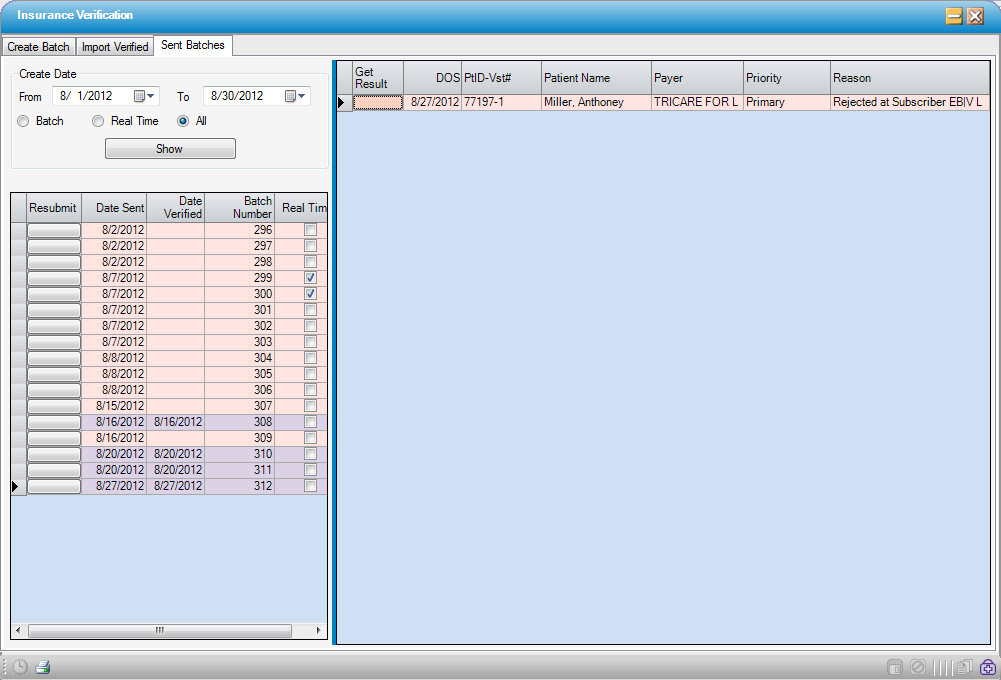
Review Sent Batches
-
Specify the desired date range (30 day maximum range.)
-
Select Batches, Real Time, or All - then select
 to view.
 -
The summary on the left will display in purple and display a Date Verified entry if the batch has been imported back into the system. If not yet imported, the batch will display in pink with no Date Verified entry.
-
Select the Resubmit button to resubmit a verification request.
-
To view applicable results, click on the line to the right of the Resubmit button.
1.png)
Real Time Eligibility
HST Practice Management’s partnership and integration with Waystar provides the ability to perform Real Time Verification from both the Appointment and Registration > Insurance forms with just the click of a button.
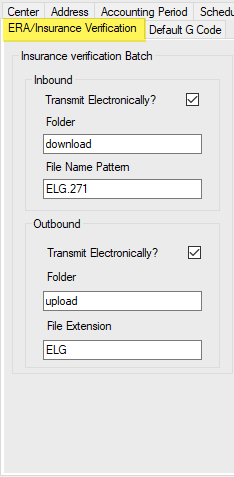
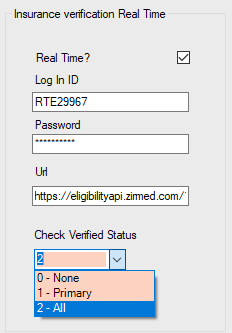
On the ERA/Insurance Verification tab of Center Configuration:
• Check the Real Time? check box to enable Real Time Eligibility
• Enter the centers RTE user ID and Password
• Enter the Waystar Url: https://eligibilityapi.zirmed.com/1.0/Rest/Gateway/GatewayAsync.ashx
• Select if/when the center wants the system to automatically check the Verified? box in Registration > Insurance > Payer Information tab:
-
0 – None: Users will be required to check the box manually in order for the payer to reflect as verified on reports and Workflow tasks
-
1 – Primary: System will automatically check the box for Primary payers only
-
2 – All: System will automatically check the box for all payers on which Real Time Eligibility was performed
When the Real Time? check box has been checked in Center Configuration,  will be visible and enabled in the Appointment and
  will be visible and enabled in Registration > Insurance.
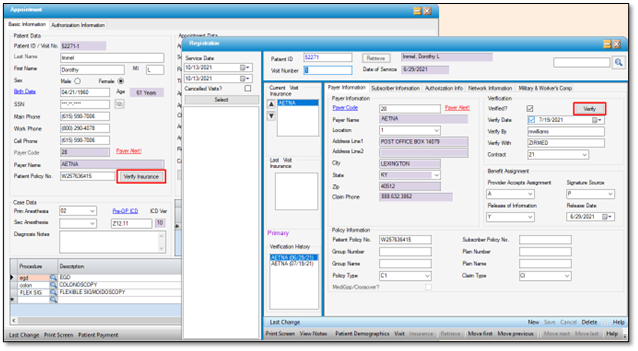
• If the Verify Insurance function is selected in the Appointment as part of the scheduling workflow, the HTML response from Waystar will be displayed. The scheduler can view the document to determine whether the patient is eligible for the insurance entered, but the file will not be saved because the Appointment has not yet been saved. Consequently, there is not yet an account and/or visit to which it can be attached.
•When the Verify function is selected in Registration > Insurance, the HTML response from Waystar will be displayed and saved to the Benefits Information section (formerly labeled Verification History) of the Payer Information tab. (The file will be retained whether or not a favorable response was received.)
• If a favorable response was received and the center has been configured to automatically check the Verified? box:
-
Verified? box will be checked
-
Verify Date will populate with the date verified
-
Verify By will populate with the userid who is logged into HST Practice Management at the time the Real Time Eligibility was run
-
Verify With will populate as ZIRMED
• When Real Time Eligibility is performed via Waystar, a function key will be enabled on the Network Information tab to 
• Selecting the Retrieve and Save Benefits function will populate both the In Network and Out of Network benefits for this payer
NOTE: We highly recommend that users continue to review the HTML file to ensure that the data that populates is accurate and make any required edits prior to running estimates. Because payers are not required to report benefits to Waystar in a consistent format, it is recommended that users continue to compare the attached HTML file to the imported data to ensure accuracy and edit any discrepancies prior to running estimates. Centers may also want to review Waystar Payer IDs to ensure that they are using IDs specific to eligibility, if available, and that their Default Service Type is set to 13 – Ambulatory Service Center Facility.
• If Save is selected following the import of the benefits, a pop up will be invoked asking users whether they also wish to review and/or update the Patient Estimate
-
Yes will invoke the Patient Estimator form, but users would still need to delete existing estimates in order to run a new one if/when the benefits have been updated
-
No will close the pop up, and the benefits information will be saved
Clariti Integration
On the System Interface tab of Center Configuration, there is a checkbox to enable Clariti, followed by a free text field that will contain the Clariti URL by default. Because Clariti is a product with which centers must enroll, it is necessary to contact HST Support at 800.290.4078 or email: hstsupport@hstpathways.com to enable this function.
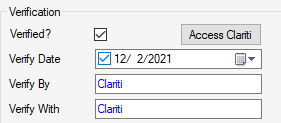
• The function in the Appointment will be disabled and the function in Registration > Insurance will be replaced by  .
.
• For centers contracted with Clariti, the case will transmit to Clariti immediately upon scheduling. It is important to note that any CPT Codes entered on the Authorization Information tab of the Appointment will be included in the transmission to Clariti, so for the most accurate estimates, please be sure to complete this tab.
• Verification is performed and estimates calculated hourly. If, however, an immediate estimate is required, users can utilize the function to open the visit on the Clariti website and manually request an immediate response.
• When Active coverage is confirmed in Clariti, the Verification section of the Registration > Insurance > Payer Information tab will populate as indicated below.
• Additionally, the Benefits Information section (formerly labeled Verification History) will populate with a single HTML file that consists of the following Clariti documents:
-
Patient Estimate
-
Benefits data (Primary Insurance followed by Secondary Insurance if applicable. Clariti accommodates two payers.)
-
Calculation Details
NOTE: Because Clariti maintains a complete history of verification, estimate calculations, and patient communications, access, and payments; only the most recent version of these documents will be maintained in HST Practice Management.
• The Amount Due DOS field on the Basic Information tab of Registration > Visit will populate with the Clariti Total Patient Due field amount. (Which will, in turn, populate this field in the Appointment in HST Practice Management.)
-
If the HST Practice Management Amount Due DOS field is blank, it will populate with the Clariti Total Patient Due amount in this field.
-
If Clariti has populated Practice Management and there is now an updated amount due from the Patient, then Clariti will update the field.
-
If the HST Practice Management Amount Due DOS field has a value, and a user other than Clariti has entered data manually, then Clariti will not override. (In other words, Clariti will not override values manually entered by a user.)
• If verification fails in Clariti, the Verified box will not be checked, and an info icon (![]() )will appear with a hover message indicating the reason for the failed response:
)will appear with a hover message indicating the reason for the failed response:
-
Inactive - Pending Eligibility Update.
-
Inactive - Pending Investigation.
-
Pending - Payer has not responded.
-
No Response - No response from payer.
-
Partial - Response received, no coverage level details provided.
-
Manual - User selected confirmation.
-
Blank - Payer eligibility unavailable/not yet requested.
-
Failed - contact patient to confirm coverage.